Method: Simple yet Fast (The Manual Method)

As this is the easiest method, you have limited options in case of design and customization.
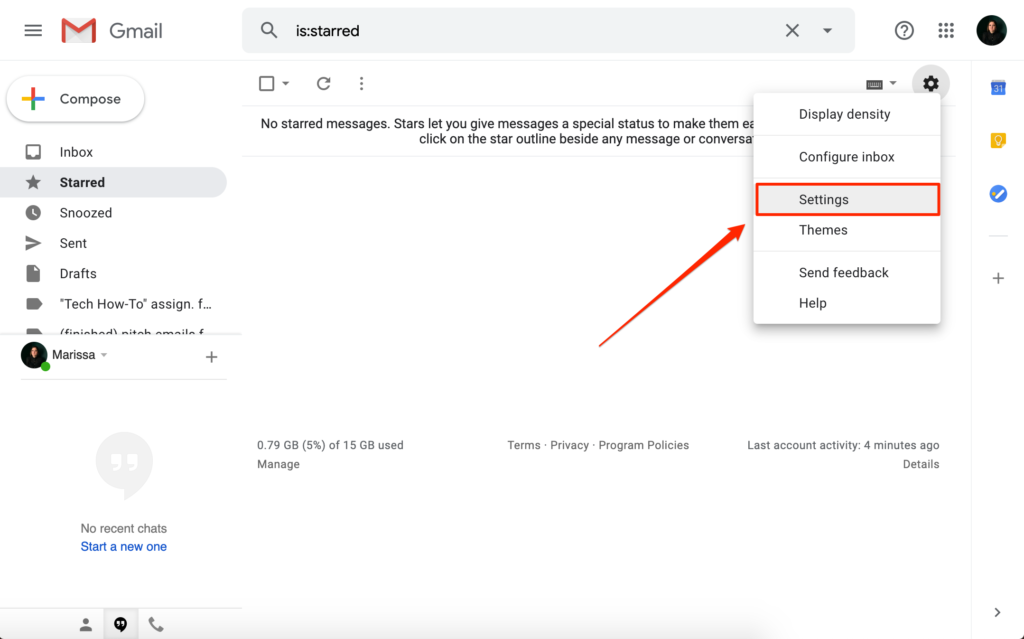
Go to settings

In your Gmail inbox, you will see a small gear icon at the top right corner. Click on the gear icon and from the dropdown menu select the “Setting” column.
“Turn on” your signature

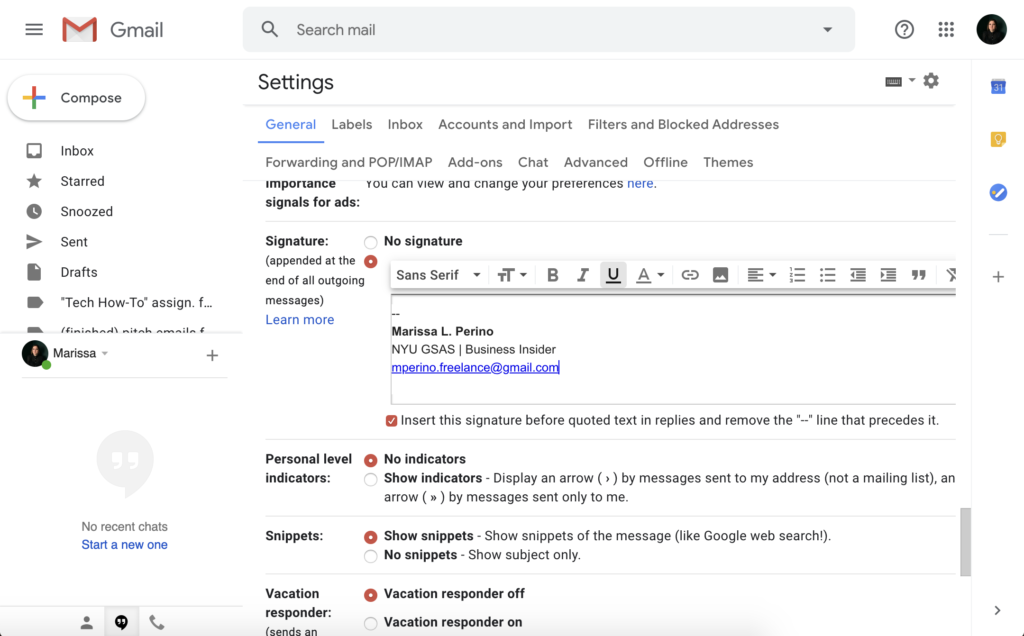
You will automatically be directed to the “General” tab of Gmail settings. You need to scroll down the page till you discover the “Signature” section.
You will find two radio buttons, one says “No Signature” (which will be selected by default), and another one that is next to a small text editor. Make sure you select this second option, as that will only turn on your signature.
Type in your signature’s content

This is the time when you actually type your signature details like your:
Name, Title, Company name, Phone number (both telephone and mobile number), website of your company and all the social media links that your company holds along with your page name.
(As signature is a great place to add helpful resources and advertise your company, be careful not to go overboard. When you place too many elements in your signature, it distracts the reader and confuses them and they tend to get bored about your company.)
Use the text editor option to make it stand out by tweaking the font, bold certain words, add colors, etc.
Add your Logo
In the text editor menu, you will select the “Insert Image” icon.
You will get the option of selecting an image from your Google Drive, you can also upload a file from your computer, and even you can type the URL of your logo. It’s better if you go with physical image instead of using a URL, as you can encounter any hosting issue or there may be a change in that URL in future.
(If you do not have a logo of your company, you don’t need to worry about as there are plenty of great tools or software’s that can help you to create one withing an hour and you don’t need to hire any graphic designer. Some popular tools are Wix, Canva, Designhill. There are some affordable designers too on sites like Fiverr and Upwork.
When you have your file ready, you will add the file and drag it to the place where you would prefer to appear. To change the image size, you just need to click on it and choose Small, Medium, Large, or Original size.
Unfortunately, in this method, you cannot “text wrap” function to locate your logo just beside your text, so you can either place it above or below your mentioned text.
Make your links clickable
In the text editor menu, you will find the option “Link”, click on it and make sure all of your links are clickable, like your web address and all the social media profiles. This option creates a convenience to the readers to directly stay connected with the brand instead of searching the company in different social media platforms.
click “Save changes.”
If you are using a CRM which is integrated with Gmail like Copper, there is one last step in this process.
Use your new signature in your CRM
Let us take Copper as an example, if you are a person who sends their emails through your CRM, make sure to change settings to add your new signature.
For this, you need to go to “Settings” in the bottom left corner of the Copper dashboard menu. Then go to “Personal Preferences” and select the option “Email Settings & Templates.”
In the end, select the checkbox called “Use Gmail Signature.”
For further more information, do follow!!


